

In this tutorial, we will learn about the BLE feature in ESP32. ESP32 has Bluetooth low Energy or BLE feature along with Classic Bluetooth. ESP32 BLE is aimed at battery operated, low-power wireless communication between different BLE Devices. We will learn all the essentials in order to use BLE in ESP32 and configure it as both a Server and a Client. We will also see how can we connect a smart phone with ESP32 BLE Server.
A Brief Note on BLE (Bluetooth Low Energy)
The main feature of the Bluetooth 4.0 Specification was the integration of Bluetooth Low Energy or simply BLE. BLE (previously marketed as Bluetooth Smart) is a highly optimized version of Classic Bluetooth designed specifically for low power wireless communication.
While the Classic Bluetooth (often described as Basic Rate and Enhanced Dara Rate in technical documents referring to its data speeds) was designed as a replacement to wired communication with short-range wireless communication. It was designed with data speeds in mind and the applications include large file transfers, wireless audio, etc.
BLE on the other hand is optimized for low power consumption instead of higher data rates and is designed with IoT and battery-operated applications in mind. Some of the popular applications of BLE are smart watches, fitness trackers, health monitoring devices, radio beacons, etc.
Unlike Classic Bluetooth, which is always connected, the BLE is usually in standby (idle) mode and wakes up if and only if required. Hence, the ultra-low power consumption.
Bluetooth Low Energy also works on the same 2.4 GHz ISM frequency band. What this means is that a single antenna can be used for Wi-Fi and both the versions of Bluetooth.
Different Layers in BLE
A BLE device consists of three layers:
- Controller
- Host
- Application
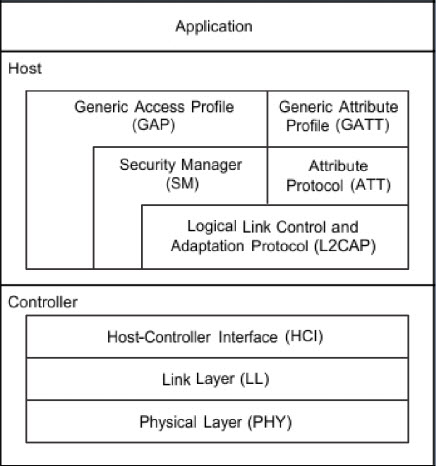
The controller contains the following:
- PHY – The Physical Layer
- LL – The Link Layer
- HCI – Controller side Host-Controller Interface
The host contains the following:
- HCI – Host side Host-Controller Interface
- L2CAP – Logical Link Control and Application Protocol
- SM – Security Manager
- ATT – Attribute Protocol
- GAP – Generic Access Profile
- GATT – Generic Attribute Profile
The application layer is the highest layer which contains user interface, data handling and logical aspects of the application.
Important Terms in BLE
Let us briefly see some of the important terms associated with BLE.
- GATT: It is short for Generic Attribute Profile. It defines the specifications for data transfer between BLE devices using Service and Characteristics.
- Characteristic: Characteristic is a group of information called Attribute and Attribute is a group of information transferred between devices. A characteristic usually contains the following attributes:
- Value: Data value of the characteristic
- Declaration: Properties of the characteristic (location, type like read, write, notify, indicate etc.)
- Description: ASCII String describing the characteristic.
- Service: A collection of characteristics is called a Service. Each Service has a unique 16-bit or 128-bit ID called UUID.
- UUID: Universally Unique Identifier is a 128-bit ID given to each service and characteristic in a profile. Use the website UUIDGenerator to generate unique IDs. Each service and characteristic has a unique 16-bit or 128-bit ID called UUID. A sample UUID looks something like this:
- 583f8b30-74b4-4757-8143-56048fd88b25
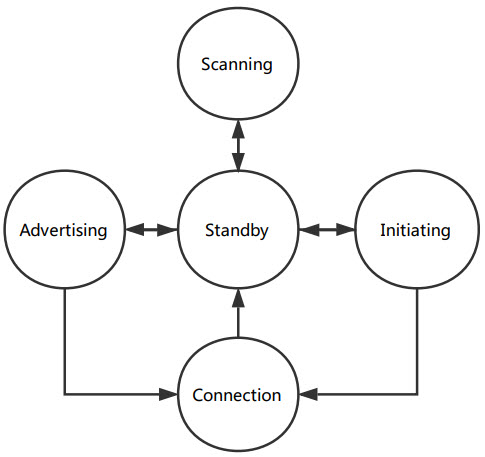
BLE States
A BLE device can have 5 possible states:
- Standby
- Advertising
- Scanning
- Initiating
- Connected
BLE Network Topologies
The communication between two BLE devices can be either a Broadcast Type or a Connection Type. In broadcasting, the ‘broadcaster’ BLE Device sends data to any ‘observer’ BLE Device. It is a one-way data transfer.
For two-way communication, you need a ‘Connection’ between the BLE Devices. A Central (Master) BLE Device repeatedly scans for advertising data packets from Peripheral (Slave) BLE Device which sends the packets.
BLE in ESP32
We know that the main feature of ESP32 is Wi-Fi. But additionally, the ESP32 SoC also has Bluetooth support as well. ESP32 Bluetooth is a dual-mode system. This means ESP32 supports both Classic Bluetooth as well as Bluetooth Low Energy (BLE).
Specifically, the Bluetooth system in ESP32 is compliant with Bluetooth v4.2 Classic Bluetooth (BR/EDR) and BLE specifications. In the previous tutorial, we already explored how to use the ESP32 Classic Bluetooth with a couple of examples. We will explore the BLE feature of ESP32 in this tutorial.
ESP32 BLE Server Client Model
Any BLE Device can be configured as a Server or a Client. ESP32 is no exception to this i.e., ESP32 can be either a Server, which advertises its presence so that clients can read its data or as a Client, which scans for servers and makes a connection to receive data from the server.
In this project, we will use two ESP32 Boards, one programmed as BLE Server and the other as BLE Slave.
ESP32 BLE Server
First, we will see how to setup an ESP32 as a BLE Server. Take an ESP32 Board and connect it to the computer. We will call this board as ‘ESP32-BLE_Server’. Open Arduino IDE and make sure that proper ESP32 Development Board and COM port is selected.
Code
This is a slightly modified code of the ‘BLE_server’ example. I commented the code to explain all the necessary things.
Upload this code to the Server ESP32 Device.
| #include <BLEDevice.h> | |
| #include <BLEUtils.h> | |
| #include <BLEServer.h> | |
| // See the following for generating UUIDs: | |
| // https://www.uuidgenerator.net/ | |
| #define SERVICE_UUID “4fafc201-1fb5-459e-8fcc-c5c9c331914b“ | |
| #define CHARACTERISTIC_UUID “beb5483e-36e1-4688-b7f5-ea07361b26a8“ | |
| /* BLEServer *pServer = BLEDevice::createServer(); | |
| BLEService *pService = pServer->createService(SERVICE_UUID); | |
| BLECharacteristic *pCharacteristic = pService->createCharacteristic( | |
| CHARACTERISTIC_UUID, | |
| BLECharacteristic::PROPERTY_READ | | |
| BLECharacteristic::PROPERTY_WRITE | |
| ); */ | |
| BLEServer *pServer; | |
| BLEService *pService; | |
| BLECharacteristic *pCharacteristic; | |
| void setup() | |
| { | |
| Serial.begin(115200); | |
| Serial.println(“Starting BLE Server!“); | |
| BLEDevice::init(“ESP32-BLE-Server“); | |
| pServer = BLEDevice::createServer(); | |
| pService = pServer->createService(SERVICE_UUID); | |
| pCharacteristic = pService->createCharacteristic( | |
| CHARACTERISTIC_UUID, | |
| BLECharacteristic::PROPERTY_READ | | |
| BLECharacteristic::PROPERTY_WRITE | |
| ); | |
| /* BLEServer *pServer = BLEDevice::createServer(); | |
| BLEService *pService = pServer->createService(SERVICE_UUID); | |
| BLECharacteristic *pCharacteristic = pService->createCharacteristic( | |
| CHARACTERISTIC_UUID, | |
| BLECharacteristic::PROPERTY_READ | | |
| BLECharacteristic::PROPERTY_WRITE | |
| );*/ | |
| pCharacteristic->setValue(“Hello, World!“); | |
| pService->start(); | |
| //BLEAdvertising *pAdvertising = pServer->getAdvertising(); | |
| BLEAdvertising *pAdvertising = BLEDevice::getAdvertising(); | |
| pAdvertising->addServiceUUID(SERVICE_UUID); | |
| pAdvertising->setScanResponse(true); | |
| pAdvertising->setMinPreferred(0x06); // functions that help with iPhone connections issue | |
| pAdvertising->setMinPreferred(0x12); | |
| BLEDevice::startAdvertising(); | |
| //pAdvertising->start(); | |
| Serial.println(“Characteristic defined! Now you can read it in the Client!“); | |
| } | |
| void loop() | |
| { | |
| std::string value = pCharacteristic->getValue(); | |
| Serial.print(“The new characteristic value is: “); | |
| Serial.println(value.c_str()); | |
| delay(2000); | |
| } |
ESP32 BLE Client
Take another ESP32 Board (which we will call ESP32-BLE_Client) and connect it to the computer. In the Arduino IDE, select the COM port for this board.
Code
There is an example called ‘BLE_client’ as a part of the ESP32 BLE Library. I used the same code here (with small modifications). Upload this code to Client ESP32 Device.
| #include “BLEDevice.h“ | |
| /* Specify the Service UUID of Server */ | |
| static BLEUUID serviceUUID(“4fafc201-1fb5-459e-8fcc-c5c9c331914b“); | |
| /* Specify the Characteristic UUID of Server */ | |
| static BLEUUID charUUID(“beb5483e-36e1-4688-b7f5-ea07361b26a8“); | |
| static boolean doConnect = false; | |
| static boolean connected = false; | |
| static boolean doScan = false; | |
| static BLERemoteCharacteristic* pRemoteCharacteristic; | |
| static BLEAdvertisedDevice* myDevice; | |
| static void notifyCallback(BLERemoteCharacteristic* pBLERemoteCharacteristic, | |
| uint8_t* pData, size_t length, bool isNotify) | |
| { | |
| Serial.print(“Notify callback for characteristic “); | |
| Serial.print(pBLERemoteCharacteristic->getUUID().toString().c_str()); | |
| Serial.print(“ of data length “); | |
| Serial.println(length); | |
| Serial.print(“data: “); | |
| Serial.println((char*)pData); | |
| } | |
| class MyClientCallback : public BLEClientCallbacks | |
| { | |
| void onConnect(BLEClient* pclient) | |
| { | |
| } | |
| void onDisconnect(BLEClient* pclient) | |
| { | |
| connected = false; | |
| Serial.println(“onDisconnect“); | |
| } | |
| }; | |
| /* Start connection to the BLE Server */ | |
| bool connectToServer() | |
| { | |
| Serial.print(“Forming a connection to “); | |
| Serial.println(myDevice->getAddress().toString().c_str()); | |
| BLEClient* pClient = BLEDevice::createClient(); | |
| Serial.println(“ – Created client“); | |
| pClient->setClientCallbacks(new MyClientCallback()); | |
| /* Connect to the remote BLE Server */ | |
| pClient->connect(myDevice); // if you pass BLEAdvertisedDevice instead of address, it will be recognized type of peer device address (public or private) | |
| Serial.println(“ – Connected to server“); | |
| /* Obtain a reference to the service we are after in the remote BLE server */ | |
| BLERemoteService* pRemoteService = pClient->getService(serviceUUID); | |
| if (pRemoteService == nullptr) | |
| { | |
| Serial.print(“Failed to find our service UUID: “); | |
| Serial.println(serviceUUID.toString().c_str()); | |
| pClient->disconnect(); | |
| return false; | |
| } | |
| Serial.println(“ – Found our service“); | |
| /* Obtain a reference to the characteristic in the service of the remote BLE server */ | |
| pRemoteCharacteristic = pRemoteService->getCharacteristic(charUUID); | |
| if (pRemoteCharacteristic == nullptr) | |
| { | |
| Serial.print(“Failed to find our characteristic UUID: “); | |
| Serial.println(charUUID.toString().c_str()); | |
| pClient->disconnect(); | |
| return false; | |
| } | |
| Serial.println(“ – Found our characteristic“); | |
| /* Read the value of the characteristic */ | |
| /* Initial value is ‘Hello, World!’ */ | |
| if(pRemoteCharacteristic->canRead()) | |
| { | |
| std::string value = pRemoteCharacteristic->readValue(); | |
| Serial.print(“The characteristic value was: “); | |
| Serial.println(value.c_str()); | |
| } | |
| if(pRemoteCharacteristic->canNotify()) | |
| { | |
| pRemoteCharacteristic->registerForNotify(notifyCallback); | |
| } | |
| connected = true; | |
| return true; | |
| } | |
| /* Scan for BLE servers and find the first one that advertises the service we are looking for. */ | |
| class MyAdvertisedDeviceCallbacks: public BLEAdvertisedDeviceCallbacks | |
| { | |
| /* Called for each advertising BLE server. */ | |
| void onResult(BLEAdvertisedDevice advertisedDevice) | |
| { | |
| Serial.print(“BLE Advertised Device found: “); | |
| Serial.println(advertisedDevice.toString().c_str()); | |
| /* We have found a device, let us now see if it contains the service we are looking for. */ | |
| if (advertisedDevice.haveServiceUUID() && advertisedDevice.isAdvertisingService(serviceUUID)) | |
| { | |
| BLEDevice::getScan()->stop(); | |
| myDevice = new BLEAdvertisedDevice(advertisedDevice); | |
| doConnect = true; | |
| doScan = true; | |
| } | |
| } | |
| }; | |
| void setup() | |
| { | |
| Serial.begin(115200); | |
| Serial.println(“Starting Arduino BLE Client application…“); | |
| BLEDevice::init(“ESP32-BLE-Client“); | |
| /* Retrieve a Scanner and set the callback we want to use to be informed when we | |
| have detected a new device. Specify that we want active scanning and start the | |
| scan to run for 5 seconds. */ | |
| BLEScan* pBLEScan = BLEDevice::getScan(); | |
| pBLEScan->setAdvertisedDeviceCallbacks(new MyAdvertisedDeviceCallbacks()); | |
| pBLEScan->setInterval(1349); | |
| pBLEScan->setWindow(449); | |
| pBLEScan->setActiveScan(true); | |
| pBLEScan->start(5, false); | |
| } | |
| void loop() | |
| { | |
| /* If the flag “doConnect” is true, then we have scanned for and found the desired | |
| BLE Server with which we wish to connect. Now we connect to it. Once we are | |
| connected we set the connected flag to be true. */ | |
| if (doConnect == true) | |
| { | |
| if (connectToServer()) | |
| { | |
| Serial.println(“We are now connected to the BLE Server.“); | |
| } | |
| else | |
| { | |
| Serial.println(“We have failed to connect to the server; there is nothin more we will do.“); | |
| } | |
| doConnect = false; | |
| } | |
| /* If we are connected to a peer BLE Server, update the characteristic each time we are reached | |
| with the current time since boot */ | |
| if (connected) | |
| { | |
| String newValue = “Time since boot: “ + String(millis()/2000); | |
| Serial.println(“Setting new characteristic value to \”“ + newValue + “\”“); | |
| /* Set the characteristic’s value to be the array of bytes that is actually a string */ | |
| pRemoteCharacteristic->writeValue(newValue.c_str(), newValue.length()); | |
| /* You can see this value updated in the Server’s Characteristic */ | |
| } | |
| else if(doScan) | |
| { | |
| BLEDevice::getScan()->start(0); // this is just example to start scan after disconnect, most likely there is better way to do it in arduino | |
| } | |
| delay(2000); /* Delay a second between loops */ | |
| } |
Working
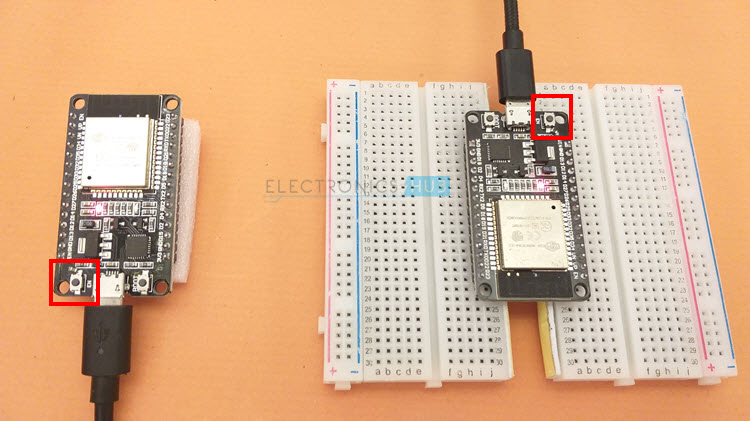
After uploading codes to both the ESP32 Boards, you need to monitor the serial ports of both the boards to see the communication. For this, I am using the Arduino IDE’s Serial Monitor to open the COM port of the ESP32 BLE Client Device and another software (like Putty or Terminal) to open the serial port of ESP32 BLE Server Device.
After opening the respective serial port terminals for both ESP32 BLE Server and Client, reset both the boards by pressing respective ENABLE (EN) buttons.
The ESP32 BLE Server device will start the BLE Server and starts advertising its services. If you observe the Client ESP32’s Code, we used the Server ESP32’s Service UUID and Characteristic UUID. What this means is that the Client ESP32 scans for BLE devices and if the BLE with the particular UUIDs is found, then it makes a connection.
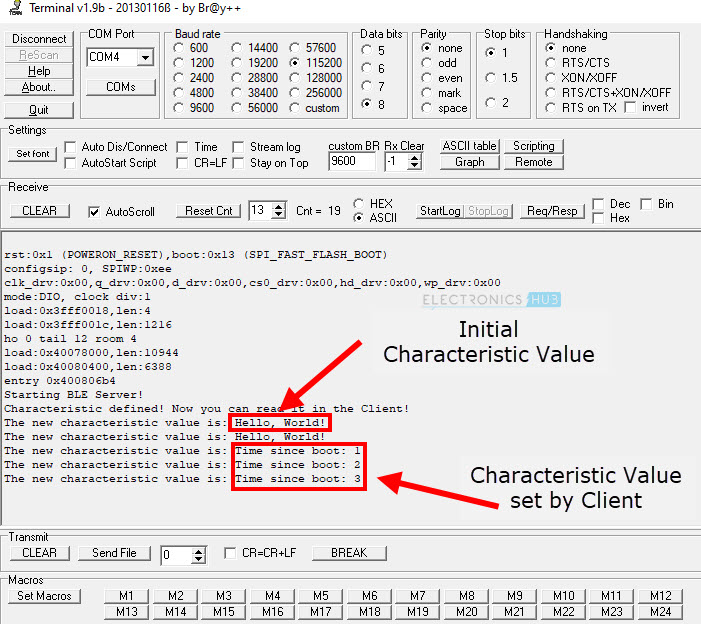
Once the connection is established, the ESP32 BLE Client first reads the characteristic value from the server (we set this as ‘Hello, World!’ in the Server’s code) and prints it on the terminal.
After that, the client tries to set the characteristic value of the server with a new value every couple of seconds. You can see the client’s terminal in the following image.

Coming to the Server, once it starts the BLE Server, it reads its own characteristic value every couple of seconds. You can see the following image that the Server’s characteristic value is updated by the client and is read by the server.
Testing ESP32 BLE Server with Smart Phone
Let us now see how can we connect our smart phones to an ESP32 BLE Server. Upload the following code to the ESP32 Board, which we will call ESP32 BLE Server and open the serial monitor in Arduino IDE.
| #include <BLEDevice.h> | |
| #include <BLEUtils.h> | |
| #include <BLEServer.h> | |
| // See the following for generating UUIDs: | |
| // https://www.uuidgenerator.net/ | |
| #define SERVICE_UUID “4fafc201-1fb5-459e-8fcc-c5c9c331914b“ | |
| #define CHARACTERISTIC_UUID “beb5483e-36e1-4688-b7f5-ea07361b26a8“ | |
| class MyCallbacks: public BLECharacteristicCallbacks | |
| { | |
| void onWrite(BLECharacteristic *pCharacteristic) | |
| { | |
| std::string value = pCharacteristic->getValue(); | |
| if (value.length() > 0) | |
| { | |
| Serial.println(“*********“); | |
| Serial.print(“New value: “); | |
| for (int i = 0; i < value.length(); i++) | |
| { | |
| Serial.print(value[i]); | |
| } | |
| Serial.println(); | |
| Serial.println(“*********“); | |
| } | |
| } | |
| }; | |
| void setup() | |
| { | |
| Serial.begin(115200); | |
| Serial.println(“1- Download and install an BLE scanner app in your phone“); | |
| Serial.println(“2- Scan for BLE devices in the app“); | |
| Serial.println(“3- Connect to ESP32-BLE_Server“); | |
| Serial.println(“4- Go to CUSTOM CHARACTERISTIC in CUSTOM SERVICE and write something“); | |
| Serial.println(“5- See the magic =)“); | |
| BLEDevice::init(“ESP32-BLE-Server“); | |
| BLEServer *pServer = BLEDevice::createServer(); | |
| BLEService *pService = pServer->createService(SERVICE_UUID); | |
| BLECharacteristic *pCharacteristic = pService->createCharacteristic( | |
| CHARACTERISTIC_UUID, | |
| BLECharacteristic::PROPERTY_READ | | |
| BLECharacteristic::PROPERTY_WRITE | |
| ); | |
| pCharacteristic->setCallbacks(new MyCallbacks()); | |
| pCharacteristic->setValue(“Hello World“); | |
| pService->start(); | |
| BLEAdvertising *pAdvertising = pServer->getAdvertising(); | |
| pAdvertising->start(); | |
| } | |
| void loop() | |
| { | |
| delay(2000); | |
| } |
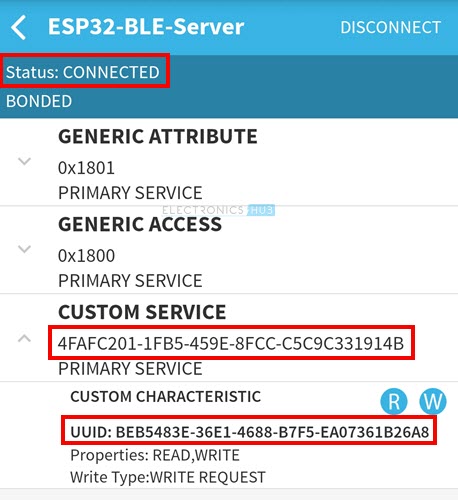
In the smart phone, go to play store and install ‘BLE Scanner’ application by Bluepixel Technologies. After installing, open the app (if ESP32 Bluetooth is already paired before, then there is no need pair once again). Enable Bluetooth and Location (both are needed for scanning BLE devices) in the phone (the app will prompt the same). Click on the ‘scan’ icon on the top right corner.
The app will start scanning for BLE Devices and lists them out. You can see ‘ESP32-BLE-Server’ in the list.

Click on ‘CONNECT’ and smart phone starts connection with ESP32 BLE Server. Once connected, it will display the list of services and its characteristics. Since we have initialized ESP32 with only one service, you can see the Service UUID and also the Characteristic UUID under the ‘CUSTOM SERVICE’ section.
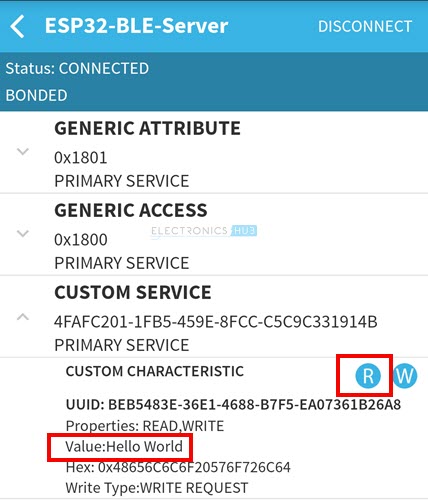
To read the initial characteristic value of the service, tap on the ‘R’ icon in the ‘CUSTOM SERVICE’ section. The app reads the value from the server and displays it in the ‘Value’ option.
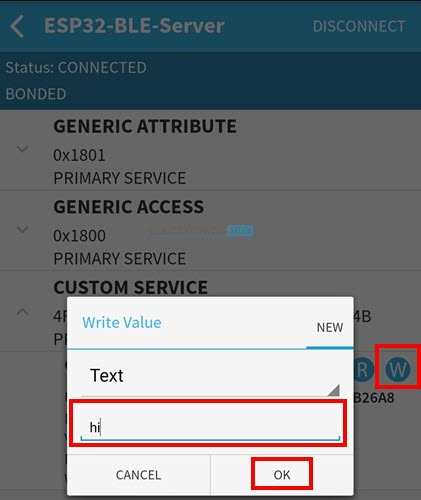
Since we set the properties of the characteristic as both read and write, we can set the value of the characteristic just by tapping on the ‘W’ icon. A text box pops up to write the value. After entering the value, click on ‘OK’. The value is set in Server.
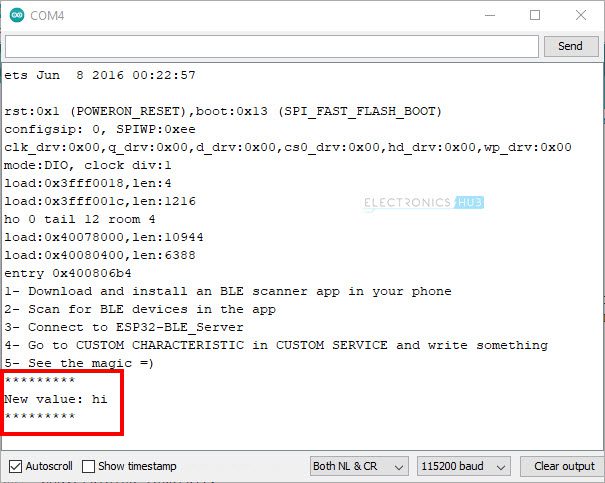
If you open the Serial Monitor of the Server, you can see the server prints out newly set value. Instead of continuously monitoring the ‘value’ field like we did in the previous example, we are actually using the callback feature of BLE Library, which will be called if and only if a ‘write’ option is initiated.
Conclusion
A complete beginner’s guide on understanding BLE in ESP32. You learn some basic features of Bluetooth Low Energy, how to use ESP32 BLE feature, how to setup ESP32 as BLE Server and Client and also how to connect a smart phone to ESP32 BLE Server.
This is just an introductory project with regards to ESP32 Bluetooth Low Energy. In the future, we will make use of BLE in ESP32 to implement several IoT related applications.


